Thursday, November 27, 2014

How to set, Person or Group field to Empty or Null in SharePoint using JSOM

There was a requirement for me, where I need to set/update custom "Person or Group" field column to empty using JSOM

Here is the simple way to do that

Create an empty array

var oUser = new Array();

and pass that empty array to column of type "Person or Group"

listItem.set_item('CustomModifiedBy', oUser)

In the above code snippet, 'CustomModifiedBy' is of type "Person or Group"

How to set SharePoint 2013 user defined date time filed to empty using JSOM

This is a very small post, where I need to set, user defined list column of type date time to null

I looked into the internet and I haven't found anything related to this. To set date time field to empty, just set "null" to that column

For ex:

listitem.set_item('UserModifiedBy', null)

In the above code snippet, UserModifiedBy is of type "Date and Time" which is not a required field and allow nulls

Monday, November 24, 2014

Deleting SharePoint Online Site Collection Programatically

Last week, I got a requirement, where I need to delete some 300+ SPO site collections. Its a tedious process to delete SPO SC manually by going to Site Settings page and click on the link "Delete site".

So I thought is there any better way to delete the SPO site collections programmatically. There is no CSOM api, where we can leverage to delete the Site Collections and one of my colleague asked me to try using HTTPWebRequest approach

Here are the high level steps that he suggested me to do:

  1. For one Site Collection, go to site settings page and click on "Delete site" link
  2. Once you are on that page, for the delete button click event, do the fiddler trace and capture the all the actions that fiddler is doing for that operation
  3. Mimic the same using C# code

I followed the same approach that he has suggested and I am able to delete the SPO site collection

Here are the important things that needs to be remembered when doing this operation

  1. First we need to authenticate using SharePoint Online
  2. Get Authenticated cookie to avoid redirects
  3. Set appropriate request headers
  4. Set appropriate POST parameters and url encode the same

Deleting a site collection using Http approach is a three step process:

  1. Authenticate using SPO credentials and get the authenticate cookie for the site collection that needs to be deleted
  2. Need to get post parameters such as form digest, view state, event target, event validation etc
  3. Using the SPO credentials and using the post parameters, created another http web request object that will delete the site collections

Authenticating to SharePoint online

To authenticate to SharePoint online, we need SharePoint client dll's. Refer the following SharePoint client side dlls

  1. Microsoft.SharePoint.Client
  2. Microsoft.SharePoint.Client.Runtime
The below method is used to authenticate the user using SPO credentials


Getting Authentication Cookie

After authentication, we need to get authenticated cookie for the site collection, that needs to be deleted

The below code is used to get authenticated cookie


We need to add the cookie that got generated to the CookieContainer class, which will be added to the HTTPWebRequest class

Setting up the HttpWebRequest instance

The below code will show how to create HttpWebRequest class and how to pass SPO credentials and how to setup the CookieContainer that has been discussed above


The url for deleting the site collection will be: "site collection url"/_layouts/15/deleteweb.aspx.

For ex: https://your tenant/teams/sitecollectionname/_layouts/15/deleteweb.aspx

For the Http Web Request class, we need to set the following properties. This information we got from the fiddler trace

Method = "POST"
ContentType = "application/x-www-form-urlencoded"
UserAgent = "Mozilla/4.0 (compatible; MSIE 7.0; Windows NT 6.3; WOW64; Trident/7.0; .NET4.0E; .NET4.0C; .NET CLR 3.5.30729; .NET CLR 2.0.50727; .NET CLR 3.0.30729; BRI/2; InfoPath.3)";

Apart from setting the properties, we also need to set some form parameters, the same form parameters that "Delete" button will set on the "deleteweb.aspx"

These form parameters we can get from the fiddler trace

1. __REQUESTDIGEST
2. __VIEWSTATE
3. __EVENTVALIDATION
4. __VIEWSTATEGENERATOR
5. SideBySideToken

In order to get the above form parameters, first we need to get the html source for the deleteweb.aspx and from that html source, we need to scrap the html source to get the above values.

I have written two functions, first function will return the html source and the second function will parse the html source and will get the desired values as discussed above


The below code will show to use the above two methods and set the post parameters for the http web request class


Setting the post data and pass that post data to the web request class


__EVENTTARGET has been hard coded to "ctl00$PlaceHolderMain$ctl07$RptControls$BtnDelete" which we got from the fiddler trace and this can be used as is until unless Microsoft does not change the button name and position in the deleteweb.aspx

The below part of post data has been hard coded which I copied directly from the fiddler trace. Convert the string post data to byte array and pass that information to the request object


 The final step is to get the HttpWebResponse for the http web request that has been created above


If the response string contains, "Working on it", then we can assume that site has been deleted
 

Thursday, November 20, 2014

Uploading multiple attachments to the lists using JSOM

In the previous blog post, we have seen how to attach a single file to the list item

In this blog post we will see how we can attach multiple attachments to a list item using JSOM. The following code will work in both SharePoint hosted apps and regular SPO web applications

The following technologies are referred/used in  the blog post

1. jquery.multifile.js
2. jquery
3. SPO client side libraries

Not much information is available in the internet to attach multiple files to the list items.

In your custom form, where you want to attach multiple files, add the following html tags which will facilitate the user to attach multiple files to the list item

As part of this post, we assume that, we have list called "MyList" and in that list we have two list columns called "FirstName" and "LastName"

When we insert data to this list, we also attach multiple list items. The below code snippet will show the simple html that has been created for the user to insert data into the list called "MyList"


As you can see in the above code snippet, I have two html text boxes for FirstName and LastName and a file input control.

To facilitate multi file upload control, I am leveraging "jquery.multifile.js" plugin. If we don't use that plugin, the user will select only one input file for upload

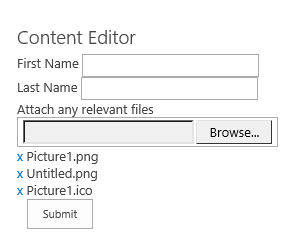
When the user selects multiple files, here is how the UI looks like

 
As you can, with the help of jquery plug in, we can select multiple files. The complete UI will look like this


I also have a submit button and on click of that button, I want to insert a new list item as well as attach as the files that user has selected

On click of btnSubmit, all the files that are selected by the user will be attached to the list item.

Here is the code snippet for the btnSubmit click event. I have written this click event in the jquery document load function


As a first step, loop all the attachments the user as selected and push that information into some javascript array. That javascript array function will just have the file information and not the contents of that file


Create another JSON array, to hold all the values the user has entered such as first name, last name etc. and including the file array that has been created above

data.push({"FirstName": $("#txtFirstName").val().trim(), "LastName": $("#txtLastName").val().trim(), "Files": fileArray});

After this, I have written some function will insert list item also attach the list items also


I am using regular JSOM code for creating the list items. Since attachments has to be inserted  to the newly created item, I need to know the ID to which I need to insert the attachments

So, first I will insert/create the data, get the list id and to that list id, we need to insert attachments


After the getting the list id, I will loop with all the attachments the user has selected. I wont resolve the function, till I insert all the list attachments. If all the attachments are inserted, I will resolve the function

loopFileUpload function need to called recursively till all the list attachments are inserted


As you can see in the above function, loopFileUpload has been called recursively till all the list attachments are inserted

With in the loopFileUpload function, I am calling another function called uploadFile which will associate the list attachment to the id that has been passed to that function


Within the uploadFile function, I am calling another function called, getFileBuffer, will will read the actual contents of the file and pass that information to uploadFile function

We are using REST based approach for inserting the list attachments as REST will allow to upload upto 2 GB of file

Here is the url that needs to be used to access the list item id to which we need to insert the list attachment


Here is the complete source code of the page that I used for this blog post


Here is the snapshot of the list item that got created using this code with multiple attachments
 

Wednesday, September 24, 2014

JSRequest

Today I was exploring JSRequest in sharepoint and I found it very useful for some of the most common things that we will be doing in SharePoint.

Some of the uses of JSRequest are:

1. Reading querystring values from the URL
2. Getting the file name of the page
3. Getting the path name of the file that is getting browsed

Before using the JSRequest properties, you need to call a method called "EnsureSetup" on JSRequest

JSRequest.EnsureSetup();

//Getting a querystring value called searchResults
var searchResults = JSRequest.QueryString["searchResults"]

//Get the current page name. i.e - "default.aspx"
var pageName = JSRequest.FileName;

//Get the current path name. i.e - "/sitecollectionurl/libraryname/default.aspx"
itemId = JSRequest.PathName;


Referred the following url's for the same

http://mahedevelopment.blogspot.com/2013/03/getting-query-string-values-using.html

http://praneethmoka.wordpress.com/2012/01/12/some-useful-javascript-variablesfunctions-in-sharepoint/


Its easy to use and easy to remember

Saturday, September 20, 2014

Usage of JSLink in SharePoint 2013

In this post we will see how to use the JSLink in SharePoint 2013.
 
Till sharepoint 2010, to customize any list views(Lists or Libraries), we are using XSLT to customize the representation of the list view or document library view.
 
In SharePoint 2013, a new feature has been added called (Client Side Rendering). In this blog post we will see what is client side rendering and how to use client side rendering and how to debug the same
 
Client Side Rendering is a new feature that got introduced in SharePoint 2013 which will allow the developers to transform the data on the client instead on the server
 
This gives lot of options to the developers to use client side technologies such as HTML, JQuery and any other javascript frameworks.
 
Some of the examples where the Client Side Rendering will be helpful:
 
1. Format the values in the list view web parts
2. Make the columns as read only in the Edit or New list form
 
 
In this blog post we will see how we can use client side rendering to format the values in the XsltListViewWebPart
 
When we talk about, client side rendering, there are two things that we need to consider in SharePoint 2013.
 
  • Display Templates
Display Templates along with Control Templates and Item Templates are used in SharePoint Search and is used to completely transform the search results display
  •  JSLink
JSLink is new property attached to list views, content types, fields and how the JSLink works is, we just need to associate a link to a javascript file to this JSLink property associated to either list views or list forms such as new or edit form
 
See the attached screen shot where the JSLink property will be found for a list view web part


In this blog post we will see how to modify the XSLTListViewWeb Part to add hyperlinks to one of the list column dynamically using the javascript and also, add some graphical image to another column where we want to display the site usage in a graphical representation

We can still achieve the same thing in the old XSLT approach and using XSLT based approach is old way of achieving the same thing

Javascript File

First we will create the javascript file and we will see how to associate this javascript file to the JSLink textbox control to the XSLTListView Webpart

As explained earlier, we will try to add a new value a Permission column. By default there wont be any value in the permission column

But when the list is rendering we will get the value from the "SiteURL" column and we will append site collection permission page of that url and we will render that new value to the "Permission" column

See the below javascript file that I have written to modify the same and we will discuss in detail about this javascript


First we need to write a javascript function which is self invoking and the syntax of that function is


(function(){
})();

So, when the page loads, that function will be called automatically. With in that function, we will write the logic for formatting the list columns inside XSLTListView web part

First we need to declare variables for fields for which we need to override the data

var overrideCtx = {};

The script specifies that we need to override the "Permission" column and we need to specify that value for the Fields override

The syntax for Fields to override was

overrideCtx.Templates.Fields = {FieldName {Scope : Override}}

  • FieldName - This is the internal name of the field you want to override.
  • Scope – This defines when to override the field. The choices are "View","DisplayForm","EditForm", and "NewForm"
  • Override – The actual override. This can be a HTML string with JavaScript embedded, or a function to be executed. In our case we are using a function that needs to be executed

overrideCtx.Templates.Fields = {'Permissions': {'View':changePermissionLink}}

In the above syntax, what we are saying was, replace the "Permissions" field value with that value that is returned from "changePermissionLink"

"changePermissionLink" is a custom javascript function that has been written which will return the value that can be placed inside the permission column

If you want to override value of another field, we can add the same to the Fields object as shown below

Next we need to register our override object with SharePoint using RegisterTemplateOverride method as show below

SPClientTemplates.TemplateManager.RegisterTemplateOverrides(overrideCtx);

Now we will see what changes we need to do to "changePermissionLink" to update the new value


changePermissionLink will take a parameter called ctx, which will give the complete context information of the current item that is being rendered, such as all the list columns information

To get the current field information, we can use either of the below syntax

var fieldValue = ctx.CurrentItem[ctx.CurrentFieldSchema.Name];
                           or
var fieldValue = ctx.CurrentItem.Permissions; //Provided if you know the internal name of the field

Then we will get the SiteURL field using the following syntax

var siteUrl = ctx.CurrentItem.SiteURL;

Then we use the following code to format the hyperlink and return that value. As you can see, we are embedding the html anchor in the format

var permissionUrl = $(siteUrl).html()+"/_layouts/15/user.aspx"
var permissionLink = 'Permission'
return permissionLink;


Associating this JS file to JSLink property of XSLTListView web part.
  • Edit the page
  • Edit the web part
  • In the edit web part properties, go to miscellaneous section there you will find a JS Link text box and to that text box value provide the url of the above JS file

When providing the path to the custom js file to the JSLink property, you can use the below syntax
 
~sitecollection/Style Library/LCACollabDB/JS/LCACollabDBRendering.js
 
To add multiple JS files to the JSLink, you can use the pipe symbol. See the below syntax for the same
~sitecollection/Style Library/LCACollabDB/JS/LCACollabDBRendering.js|~sitecollection/Style Library/LCACollabDB/JS/LCACollabDBRendering1.js


Monday, August 11, 2014

Adding jQuery reference url to a page if the jquery is not loaded from local project references

In lot of the web applications, adding jquery references is a common practice. There can be scenarios where the jquery that has been referenced in your page might not be loaded due to Connectivity Issue or for some other reason and you don't want the page functionality to break because jquery is not loaded.

The below piece of code will load the jquery from CDN, if the juqery is undefined in your page


The LoadResources function will first check if jquery is defined or not. If not defined, it will try to create a scrip tag and to the script src attribute it will set the jquery CDN url. After setting the src attribute of the script tag to the jquery CDN url, add that script element reference to the head tag

Check jquery sit to get all valid CDN url's