Friday, July 25, 2014

Add a new user to the user field list column in SharePoint 2013 using JSOM

In this small post we will see how we can add user to a user column using JSOM. Assuming that the user entered is a valid user


We have created a new javaScript array variable called oUser

To this array we are pushing user information with the help of javascript function called SP.FieldUserValue.fromUser

To fromUser method, we are passing the valid email and we are setting this oUser object array to the list item
 

Thursday, July 24, 2014

Upload/attach files to SharePoint 2013 list items using REST based approach

In this post we will see how we can add list attachments to the list items in SharePoint 2013 online using Javascript.

Some of the content in this post has been taken from the URL - http://sharepoint.stackexchange.com/questions/60417/cant-upload-a-non-text-file-to-sharepoint-app-via-rest-api and the response has been posted by Fedor Shihantsov

I found lot of articles for uploading documents to the document libraries using REST based API in javascript. But very few articles has been posted for attaching the documents to the list items

SharePoint 2013 supports the following technologies to manipulate SharePoint on the WEB


1. JSOM
2. REST

JSOM is having the size limitation of 1.5MB when uploading documents to SharePoint

Using REST we can upload attachments up 2 GB to SharePoint

In this post we will see, how we can upload the documents to SharePoint list items using REST based approach

Note: This has been tested in IE10+ and Latest google chrome and the browser has to support HTML5 where we will leverage file reader functionality

Lets start exploring for uploading/attaching files to list items

Step 1:

On the SharePoint page, add an input file control and another control of type button to submit the file 


In the above code snippet, I added an input file control and a button to upload a file. 

On click of this button, I wanted to attach the file to a list item id of 1


In the above code snippet, on click of a button, we are checking whether any file has been selected for upload or not

fileName will give the file name the user has uploaded and file variable will contain the actual file content that has been selected for uploaded

We are calling a function called upload and to this function, we are passing the list name, the list id to which we wanted to attach the file


With in upLoadFile, we are calling another javaScript function called uploadFileSP, where the actual code for uploading the file into SharePoint will take place

First we need to get the contents of the file as bytes and the below script will convert the file contents into bytes

To convert the file contents as array, we will be using HTML 5 FileReader object. See the below code for the same. 


getFileBuffer is internally called with in uploadFileSP


Once we get the contents of the file as byte array, need to convert the byte array to binary string

To upload the file, we will be using SP.RequestExecutor and use executeAsync method of SP.RequestExecutor to upload the file

To executeAsync, we need to pass the following information

url: REST based url of list item id, for which we need to attach the list item. 
method: "POST". 
binaryStringRequestBody: true - whether we are sending the contents of the body in binary format
body: The contents of the file 
success: The successcall back function when the file is uploaded successfully
error: The failure call back function if there is any error in uploading the file
state: "update" - We are updating the list item and not insert


The following web sites has been referenced for this post

http://www.shillier.com/archive/2013/03/26/uploading-files-in-sharepoint-2013-using-csom-and-rest.aspx

http://chuvash.eu/2013/02/20/rest-api-add-a-plain-text-file-as-an-attachment-to-a-list-item/

http://sharepoint.stackexchange.com/questions/60417/cant-upload-a-non-text-file-to-sharepoint-app-via-rest-api

Thursday, July 17, 2014

SharePoint 2013 Tips and Tricks - GetUrlKeyValue, SetUrlKeyValue

There are lot of utilities and functions available on the client side SharePoint 2013 API and in this post we will see one of those API called GetUrlKeyValue and SetUrlKeyValue

There are scenarios where we need to get or set the value from or to the querystring of the URL and SharePoint provides an easy way to do this

GetUrlKeyValue:

This small utility function will try to get the value from the querystring of the url. There is no OOTB function to get the querystring value using javascript and this GetUrlKeyValue will help us in getting the value from the querystring

This function has been declared in in init.js. Ensure that init.js is referenced and loaded before you use this function.

Syntax: The syntax for GetUrlKeyValue is

GetUrlKeyValue(keyName, decodeQueryStringValue, url, caseComparison)

keyName: The querystring name for which we need the value

decodeQueryStringValue: Whether you want to decode the value - default value false

url: The url from which we need to retrieve the keyName value

caseComparison: Case sensitivity for keyName. - default value true

Example:


In the above example, we wanted to retrieve "EditPage" querystring value from the current url - window.location.href

window.location.href can be replaced with your own url

The return value from this method is, string representation of querystring value and in this case it is "EditPage"

If the EditPage key doesn't exists in the url, it will return an empty string

SetUrlKeyValue

This is opposite to GetUrlKeyValue. In GetUrlKeyValue, we will getting the value from the querystring and in SetUrlKeyValue, we will be setting the querystring value

The syntax for SetUrlKeyValue is,

SetUrlKeyValue(keyName, keyValue, bEncode, url)

keyName: The querystring name to which we need to set the value

keyValue: The value that needs to be set to the keyName

bEncode: Whether the value needs to be encoded in the url before setting the value

url: Url to which the value needs to be set

Example


Thursday, July 10, 2014

Opening a Page as modal window using JSOM in SharePoint 2013

There are many scenarios where we need to open custom pages or OOTB pages in a pop up. SharePoint provides an API to open the pages in pop up and in this post we will see how we can achieve the same using on the client side using JSOM

We will explore the following methods from the SharePoint 2013 client side library which will help us in opening the page as a dialog.

We will consider the following scenario when opening the page as a dialog:

  • How to open the page in a dialog
  • How to pass data to the dialog page
  • How to return parameters or data back to the calling page from the dialog page
First we will see how to open the page in a dialog window. In order to open the page in a dialog, first we need to set the dialog window properties such as

  • Dialog Window Title
  • URL of the page to be shown in dialog window
  • Width and height
  • Allow dialog to maximize
  • Allow dialog to close
  • Need callback from the dialog window to the parent window
  • Data for the dialog window that needs to be passed from the parent window
So, I have written a function in javascript with those parameters that can be called from the parent window. The below JavaScript code will show that information


We have written a function called openInDialog which can be called from the Parent page and to this method we are passing all the parameters such as title, width, height etc. that discussed above


Then we have created a variable called options which has to be a JSON object that needs to be passed to the SharePoint JavaScript function which we will discuss later


Ensure that you use the same key names in the options variable such as args, showClose, allowMaximize etc

Its always better to pass data in JSON format to the modal window

If we need callback from the dialog window, we need to set a property called dialogReturnValueCallback. To that property, we need to set a custom call back function that will be called when the user closes the dialog window


Here the closeDialogCallBack is a custom callback function that will be called when the user closes the dialog window. We will explore this custom callback function later in this post

To open the page in a dialog, we need to call a sharepoint function called showModalDialog which is defined in the namespace SP.UI.ModalDialog and this name space is present in the JS file sp.ui.dialog.js


To showModalDialog function, we are passing options as a parameter which we have created above

In the dialog window, we can access the data that is passed from the parent window as follows


dialogArgs contains the data that is passed from the parent window
Once the business is completed in the dialog window, the user will press OK or Cancel button in the dialog window.

Before clicking on OK or Cancel button, we need to prepare data that needs to be passed to the parent window. We will see how to prepare the data that needs to be passed to the parent windows


In the above code, we have created a javascript array and to this javascript array we are setting some data and we want to send this data to the parent window and the parent window can take some action based on the data that is sent from the dialog

There are two actions that can be done in the pop up either OK or Cancel. Here are the SharePoint functions for OK and Cancel click events

When the user click on "OK" button, we can call the below SharePoint function
 
SP.UI.ModalDialog.commonModalDialogClose(SP.UI.DialogResult.OK, popData);

When the user click on "Cancel" button, we can call the below SharePoint function

SP.UI.ModalDialog.commonModalDialogClose(SP.UI.DialogResult.cancel, popData);

 As you can see, we are passing popData javascript array to both ok and cancel button.

 commonModalDialogClose sharepoint function internally calls the callback function that we discussed earlier in this post.

In our case we have created a call back function called closeDialogCallBack and this will be called when we close the pop up


Friday, July 4, 2014

New Custom Styles and new bulleted styles to SharePoint 2013 Rich Text Editor

By default SharePoint 2013 RTE provides two bulleted styles such as bullets and numbers as shown below


We can add new styles to support new bulleted styles and for this we need to extend the styles that comes with SharePoint 2013.

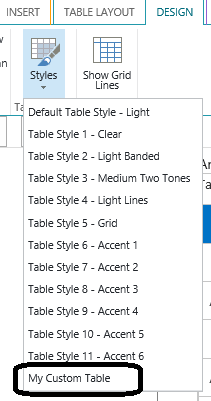
In one of my previous post, I have explained how to add new table styles. Here is the URL for the same.

In this pose we will see how we can extend styles and elements of SharePoint 2013 styles so that we can add our own styles

There are two sections in Styles in RTE for SharePoint 2013 called
  1. Page Elements
  2. Text Styles
First we will see the difference between Page Elements and Text Styles

Page Elements:

Page elements: Page elements are HTML elements such as Span, H1 to H6 etc. This will apply styles to particular html elements.

To add new page element styles we need to use the below syntax

elementName.ms-rteElement-yourName

Here elementName is any html element as explained above. For elements, we need to extend ms-rteElement

Text Styles:

This will allow to change styles for the text portion. For ex: I have a text called: "SharePoint 2013 has great features when compared to SharePoint 2010". I wanted to highlight both SharePoint 2013 and SharePoint 2010 to different styles and in this scenario we will be using text styles where we can apply different styles to the text

ms-rteStyle-yourName

For styles we need to extend ms-rteStyle.

The below steps we will see how we can create new styles and elements. For the elements we will see how we can add new bulleted styles and for styles we will see how we can add new text styles


Steps:

1. Create a new CSS file called RteStyles.css and in that css we will create one CSS styles for text style and another CSS style for elements where we will add new bulleted style for exclamation (!) and section (§) as shown below


We also  build another style for text, where we will highlight the text red in color and we will make the text bold as shown below


RTE Element Styles


In the above RTE element styles, we are trying to add styles to html element h6. We have given the value to -ms-name as "LSW Glyphs Exclamation". A element style will appear in the element section of the RTE Styles as shown  below

We also need to specify -ms-element to true otherwise the new element style will not appear


As you can see, a new styles as been added for exclamation. If you select that styles, a new exclamation will be added at the start of the text. For getting the exclamation we added a glyph style called "\0021".

See the below url for some of the glyphs styles:

http://css-tricks.com/snippets/html/glyphs/

For getting new bulleted styles, we shouldn't use any of the existing html elements. So I have used new elements such as h7, h8 etc. If we use existing html elements such as h1 to h7 or Para tag or Span tag, we wont get bulleted functionality
 
So, to get bulleted functionality, I have used new  elements such as h7 and h8 for exclamation and section bulleted lists. See the below styles for the same


As you can see above, we have added two element styles for h7 and h8 to get new bulleted styles for exclamation and section. See the below image for the same


As you can see in the above figure, two new RTE element styles for h7 and h8 tags as been added


The newly created styles should be added to the master page


Now where ever rich custom editors has been used such as "Publishing Html Fields" or "Content Editor Web parts", the new RTE styles will be seen

For Text styles, we need to follow the same procedure as we followed for elements. Instead of rteElement, we need to specify rteStyles.

Since rteStyles will act on the text portion, no need to specify any html tags before rteStyles.

The signature to extend rteStyles are show below


As you can see in the above, we created rteStyle with styleName and this name can be replaced with your own style name

Also, I have given -ms-name as "New Style" and this name will appear in the RTE styles as shown below 


As seen above, a new text style with the name "New Style" will appear in the Text Styles window

Select some text in the RTE editor and you select the above mentioned styles, then the selected text will have that styles(Text will appear as bold and red color will be applied)
 

Thursday, June 26, 2014

Adding custom RTE Table Styles to SharePoint 2013

Out of the box SharePoint RTE provides 12 table styles and there are scenarios where we need to add new table styles.


As seen above, there are 12 table styles and to this we will add two more table styles

SharePoint provides extensibility framework to add custom table styles and in this post we will examine how to add custom table styles to the RTE. We can add as many table styles as we want but we need to follow some naming conventions so that RTE knows to add those custom table styles

In order to add new table styles, we need to extend "ms-rteTable" class and we need to prefix our own name to "ms-rteTable".

If we don't use "ms-rteTable" then new table styles wont appear in the table drop down.

Steps:


  1. Create a new CSS class and I created a class name called customRTETableStyles.css
  2. To this css class, I have created the below styles
  3. In the above CSS class, I have created my own table style by extending ms-rteTable and I have given the same as "ms-rteTable-myCustomTable"
  4. -ms-name: Give some name to property that you wanted to see in the table style drop down.
  5. In this case I have given the name as "My Custom Table" and this name will appear at the bottom of all the table styles
  6. Save the above CSS file into any sharepoint document library and preferably "Style Library"
  7. Refer that css file in your master page
  8. Edit any Rich HTML Field or Content Editor Web Part
  9. Insert Table and highlight the table and go to Design tab in the ribbon
  10. Under table styles, you should see our new table style as shown below
If you select the above table style, the table inside the Rich HTML Field and Content Editor Web Part will have that table style and in this case it is having the following features

1. Table header will be having blue back ground
2. Table border will be having gray color
3. Padding is 10px


In order to add new RTE table style, copy the above code and replace "myCustomTable" with new name and new RTE table style will appear


Wednesday, June 18, 2014

Using jquery templates to display sharepoint list data on the client side using JSOM

The following post will provide a scenario where you want to format sharepoint list data data using jquery template and everything on the client side using JSOM

As every body might aware that SharePoint online wont allow server side coding and everything needs to be written on the client side only

In the SharePoint online world, the developer should be using JSOM to retrieve the sharepoint data. Once the data is retrieved, the data should be presented to the user in a presentable way and in this post we will see how you can use jQuery, jQuery Templates to display SharePoint list data.

For this post, I will consider a SharePoint list called Customers and I have the following list columns inside that Customers list

1. First Name
2. Last Name
4. Email

When displaying the data, I wanted to combine First Name and Last Name and I want the email to be an hyperlink for the First Name and Last Name and I want to display the data as an unordered list. The final output will look something like this

This post will explain how we can do the same in SharePoint online using JSOM, JQuery and JQuery Templates

The first step in getting the data from the sharepoint list is to get reference to SharePoint and to get a reference to SharePoint context we need to load required Sharepoint JS file and the JS that needs to be loaded is SP.js. The following code snipped will show that information


In the above function we have created a small function called GetSharePointListData and to that function we are passing the list name and the CAML query that needs to be executed on the list, there is also an anonymous function called OnGetSuccess and we will discuss more on this later in this post
We have created another function called getData and in this function we will fire a request to SharePoint and fetch the data.


The following code will show the information on how to get context to SharePoint


Once you get a context to SharePoint, the next step will be, try to get context to the current web and the list from which you want to retrieve the list items and display the results


Once we set all the context, fire an async request to SharePoint and the following code will show that information


In order to display the data in the format that we require, we need to store the data on the client side that is retrieved from the SharePoint.

To store the data on the client side, we will use JSON and in the above code snippet, we are using dataset[] variable for that purpose.

For each and every item that we are getting from the sharepoint, we are storing that information in JSON array and we are using the following code snippet to store the data into JSON array


 Once we get all the data, we return the data from the function using the anonymous function that we are passing as a parameter to _getData function

onGetSuccess(that.DataSet);

that.DataSet contains all the sharepoint list data in json format. The following code will show how the list data looks like in JOSN format


If there is any error that SharePoint returns, we are capturing that information in another anonymous function and in that function we are calling another function called _onFail and in that function you can capture sharepoint error and update the UI accordingly.

Once we have the JSON data, we can make use of JQuery and JQueryTemplate plugins to display the data accordingly. We can make use of other plugins such as UnderScore or some other plugins for displaying the data. In this post we are using jQueryTemplates for displaying the data

The following code will show, how we can call the function GetSharePointListData and pass the required parameters. The following code snippet will show that information

GetSharePointListData(spListName, camlQuery, function (data) {
    $("#customerTemplate").tmpl(data).appendTo("#ulCustomer");
});


 In the above code snippet, #customerTemplate is the jquery template where we have written how the data should be displayed and formatted and more on this later in this post

To that template we are passing the data (JSON data) and we are appending the completed HTML to ul tag with the name "ulCustomer"

The following code snippet will show customerTemplate html template with the place holders for the data that is coming from JSON data


I am displaying the data in un-ordered list format, where FirstName and LastName becoming an hyperlink and on clicking of the hyperlink, default email client will open

The final output of the data will look like this
References

jQuery Template: http://plugins.jquery.com/loadTemplate/1.4.4/

Let me know your comments on this post